|
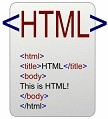
H T M L G u i d e
The Ultimate Reference Guide to Hypertext Markup Language |

|

|
| 1. Getting Started | 2. HTML Tags | 3. Minimal HTML Document | 4. Page Options | 5. Character Formatting |
| 6. Lists | 7. Hyperlink to URL | 8. Including Images | 9. Images, Sound & Animation | 10. Client-Side Image Maps |
| 11. Meta Tags | 12. Tables | 13. Forms | 14. Frames | 15. NOSCRIPT |
| IMAGES, SOUND & ANIMATION |
|
External Images
Sounds
The syntax for linking to external images, movies and sounds is the same; the only difference is the file extension of the linked file.
Common File Types & Extensions
Note: Keep the capabilities and limitations of your intended viewers in mind; not all format are supported by every system and/or browser...this means that in order to view/hear any of these file types, the user must have
software for those corresponding file types installed on their system! Thus, for compatibiltiy across all 5 major browsers (and WebTV/MSN-TV users), for images I stick with .gif and .jpg; for sound files I stick with .mid or .wav; for movie files I stick with .wmv, .mpg, or .mov; and for everything else the user can download such content and to do so, use hyperlinks! Keep in mind that any of these extensions can be capitalized...
I recommend downloading Flash Video Downloader Suite, which is safe, FREE, easy to use, and allows you to download virtually any video file from the Web (such as embedded ones from YouTube). I think the most beneficial feature of this suite is its Converter section, which allows you to change various media files into other media files that your system is compatible with! If you are looking to compress large files (such as .avi files from FlipVideo) to a smaller file size that Apple's QuickTime player is compatible with, then you will need to install/upgrade to QuickTime Pro which cost me $30.
Background Sounds
For Google Chrome, Opera, Mozilla Firefox, and Apple Safari users you will have to use the EMBED tag, which is to be placed anywhere in the BODY of your document...doing so will automatically leave space for a default sound object to appear (which looks like blank space). Therefore, I suggest placing the EMBED tag just before the closing </BODY> tag, with both a Paragraph <P> and a forced line break <BR> tag above it to sort of 'space' it away from other elements of your page. However, because you have already placed the BGSOUND tag within the HEAD tags of your document (for MSIE and WebTV/MSN-TV users), you will need a little extra code that tells the MSIE and WebTV/MSN-TV browsers to ignore the following EMBED tag:
Note: Again, Apple Safari, Mozilla Firefox, Opera, and Google Chrome all support the EMBED tag, but not all of those 4 browsers support each of those attributes you see above; such as HIDDEN, which some browsers such as Google Chrome will ignore. The AUTOSTART attribute with a value of TRUE obviously indicates that the sound file will automatically play when the page loads, and in this case, the LOOP attribute as two possible values: TRUE or FALSE.
|

| CLIENT-SIDE IMAGE MAPS |
|
Client-Side Image Maps <MAP></MAP>
Note: By associating URLs with hotspots, one image can contain multiple hyperlinks to URLs.
In the HTML source, the client-side image map consists of three parts:
shape=rect coords="leftx, topy, rightx, bottomy" shape=circle coords="centerx, centery, radius" shape=poly coords="x1,y1, x2,y2, x3,y3, ..." Note: x and y are measured in pixels from the left/top of the associated image.
The image used in the illustration (below) is a single graphics file. In the image, each colored shape is associated to a different action; the circle is linked is linked to myweb.com; the square is linked to the page of that Web site called 'about me'; the polygon is linked to the page called 'digital'. Programs such as Mapedit allow loading the GIF image into a window; polygons, circles, and rectangles can be drawn on the image and URL's designated for each shape forming a hotspot; it also allows you to add, edit or delete hot spots; Mapedit will create the map file and comes with an on-line help manual; download a copy of Mapedit from http://www.boutell.com/mapedit for $15. 
|
| META TAGS |
|
Refresh
The refresh tag automatically forwards the user to a new page; this is commonly used in intro pages--also referred to as splash pages--to let the user see an introduction to the site before being guided to the real home page; another common use of the refresh meta tag is to forward users from out-of-date links; this is important for keeping pages that are already registered on search engines, even though the domain may have transferred; the search engines often contain many dead links that place higher than functional ones; it is important to keep all the pages that you've registered with the search engines because the links will show up on the search engines anyway; it is better to have them forward to the correct domain; this way, you can be sure that your site is getting more visitors, and it is much easier than having to re-register a new set of pages; the refresh meta tag goes inside the <head> of the document, like this:
<HTML>
Note: You may have noticed that in the middle of the code up there I used an escape sequence: which inserts a single space. Use this escape sequence whenever you need to insert some
(horizontal) space between text and images, or some space between images/text and the edge of a table or the browser window itself (especially necessary if your text/images etc. are not centered and therefore left-aligned,
and/or if you prefer a little space before the right edge of the browser window if you have right-justified your elements). You can insert multiple space by just repeating this escape sequence (consecitively).
The amount of time the page takes to refresh is specified in the value of the CONTENT attribute, after 'REFRESH'; in this case, the page refreshes after six seconds.
Here are more examples of common meta tags:
<META HTTP-EQUIV="Content-Style-Type" CONTENT="text/css">
<META HTTP-EQUIV="Content-Type" CONTENT="text/html;charset=characterSetName">
<META NAME="date" CONTENT="date">
<META HTTP-EQUIV="Content-Script-Type" CONTENT="type">
Keywords
<TITLE>Keywords</TITLE>
It is also common to include a separate tag for a description of the page:
<TITLE>Description</TITLE>
Meta Robots Tag
<META NAME="robots" CONTENT="noindex,nofollow">
|
| TABLES |
|
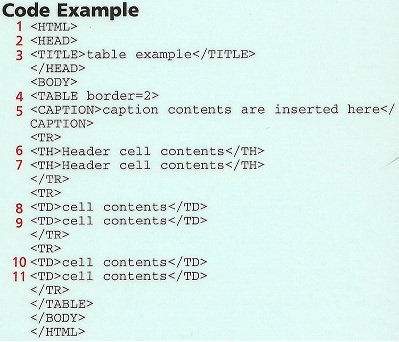
Tables are very useful for presenting tabular information and organizing complex Web pages; a table consists of heads to explain what is included in columns and/or rows, rows for information and cells for each item. Tables are also used for organizing various elements of a Web page to be displayed in a way that is not only logical (makes sense) but is easy to read and navigate for the user. This is accomplished by grouping similar elements in a table which in turn allows you to properly align such elements (text, hyperlinks, images, etc.) so that they are properly spaced. Many Web pages use tables for this very purpose and because such tables may not have borders, you probably did not even know that such a table exists!
Table Elements
Table Attributes
Tables with Images
|
| FORMS |
|
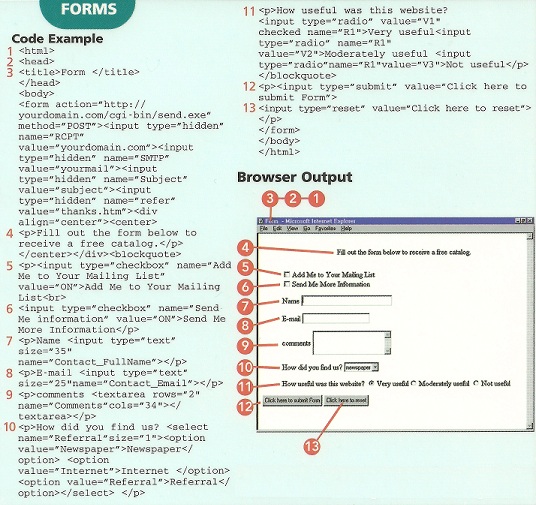
Forms allow you to structure input from the user, such as customer response...such feedback is not only necessary for e-commerce (companies that also do business on the Internet through Web sites), but being interactive is and always has been one of the most crucial aspects of the Internet: Never underestimate the importance of allowing your visitors the opportunity to submit comments, suggestions, etc. After all, even if you have a storefront location and provide visitors of your Web site with such address and phone number--that assumes that you instead wish for them to visit your physical location or call you. Just as someone who is on the phone with customer service or actually frequents a place of business does not want to be told to go to the company's Web site for further assistance (Hello--they are talking to you now!), you do not necessarily want to direct your visitors away from your site by pushing other contact information. Instead, (since they are trafficking your Web pages) offer a way for users to fill out a form and submit all information in a standard (everyone has filled out forms that ask for name, address, and phone info, so follow conventions when designing such forms) format. Even if your site is not for business, having forms indicates the sincerity and professionalism (knowledge) of what you do.
Constructing a form is a two-part process:
The syntax for creating forms consists of 3 distinct elements between the <FORM></FORM> tags:
How a Form Works
|
| FRAMES |
|
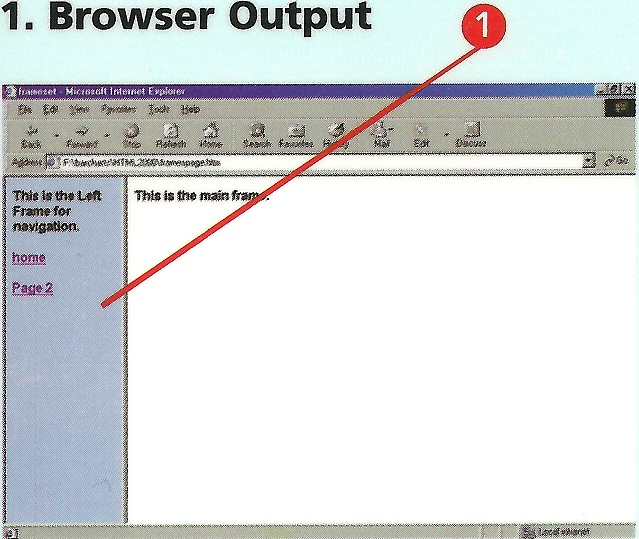
Frames pages are a way to include multiple pages together within a single browser window or tab; each frames page, or frameset, acts as a template that loads pre-existing pages into their specified positions or
frames; by keeping the pages in a frameset, each new page loads independently of the others; this allows you to keep the site's navigation separate from the main content or any other features you may wish to include on each page.
The use of frames pages in a Web site is also a convenient way to manage and edit the site's contents; for instance, if the navigation buttons were on the same page as the main content, you would have to change the
navigation on every page whenever it needed an update; however, by using a single page as the main navigation, you only have to make changes on that page.
Simply put, visiting a site that uses frames is a page whose code only consists of displaying two or more other pages, and that code just instructs the browser how to partition the window (or tab) into columns and/or rows--where each row and/or column is a different page that occupies a specified amount of the browser window, either in pixels or as a percentage of the total height (rows) and/or width (columns). Similar to tables, using frames allows you to display many elements of your entire site and organizes them in a way that, if no border is set, probably is not even noticed by the visitor. Common uses of frames, for example, are:
Contents Frame
Code Example:
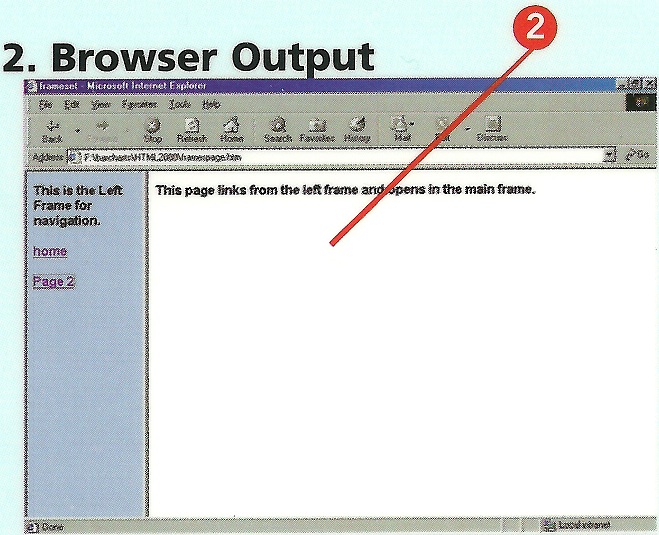
Note: The Code Example above shows use of the <BASE> tag (which has no end tag). The purpose for this tag is to tell the browser which frame to load pages into from links clicked from any other page within the frameset...by giving one particular frame a name of 'Main' and instructing the browser (with the BASE tag), then all hyperlinks will open only in the frame named 'Main'. However, you can bypass this with the TARGET attribute of the anchor tag (I waited until now and not earlier when first discussing hyperlinks so as not to confuse what TARGET would even be used for). Using the TARGET attribute is only applies to frames, as each frame is given a name in the FRAMESET tag (discussed further below). By specifying a name such as 'Main' as a value for the TARGET attribute, all links are opened/loaded into the 'Main' frame...but even if the BASE tag specifies a default TARGET, use of individual achor tags (Hyper-Reference = 'link') that also use the TARGET attribute can instead open a link in a different frame, or in a new window (or tab) altogether, by using the following value:
<A HREF="different_site.html" TARGET&61;"_BLANK">Open link in a new window</A>
Main Frame
Code Example
You can even create frames inside the main frame; floating frames or in-line frames appear inside the page; simply place the following tag inside the body of the document, specifying the page to be loaded:
<IFRAME SRC="iframe1.htm"></IFRAME>
Ir is important to keep the users from completely leaving your site when you offer links to other sites; normally, without frames, this is done by opening a new browser window (or tab), which may leave your site open but
obscures it with the new window; frames pages allow you to open a page from another site within your own site; to do this, simply link the external pages to open in the 'Main' frame.
Frameset
<FRAMESET COLS="20%,80%"> The <FRAMESET></FRAMESET> tags will replace the <BODY></BODY> tags found in normal HTML documents; the entire page should look like this:
<HTML>
Note: The example above uses columns (as per the COLS attribute), but if your frames consists of horizontal rows, then replace that attribute with ROWS. Also, notice that no end tag is used for the FRAME tags. In addition, you may have noticed the second FRAME tag the use of the SCROLLING attribute: You may or may not want vertical or horizontal scroll bars to appear, therefore the SCROLLING attribute has 3 possible values: TRUE, FALSE, or AUTO (FALSE prevents scroll bars from appearing, even if the content of such frame extends beyond what is visible in the frame; and the AUTO value becomes TRUE only in the event that such frame has enough content to warrant such scrollbars).
The <NOFRAMES></NOFRAMES> tags should be placed before the </FRAMESET> tag whenever frames are used, in the event that the user's browser does not support
frames (or if you somehow messed up in your code and therefore such frame info will not be displayed). Therefore, using the <BODY></BODY> tags are necessary at the point to establish a body for your Web page with such text notice...
When building framesets, it is important to make sure they look the same in different browsers; just because a page looks good in Microsoft Internet Explorer doesn't mean it will work in other browsers! Recall what I mentioned about downloading all 5 major browsers (Microsoft Internet Explorer, Apple Safari, Mozilla Firefox, Google Chrome, and Opera), as they are all free, safe, do not take up large amounts of space, easy to find on-line and install, and will allow you to check your pages for compatibility. If you have both a Mac and system running Windows, download all 5 of these browsers on both platforms (especially if there is a difference in screen resolution between computers), as well as viewing your work on browsers from mobile devices (e.g., cell phone Web browsers, iPod Touch, iPad, etc.).
By default, there will be borders on the frames; to eliminate the borders, you must specify the following inside the initial <FRAMESET> tag:
<FRAMESET COLS="20%,80%" FRAMESPACING="0" BORDER="0" FRAMEBORDER="0">
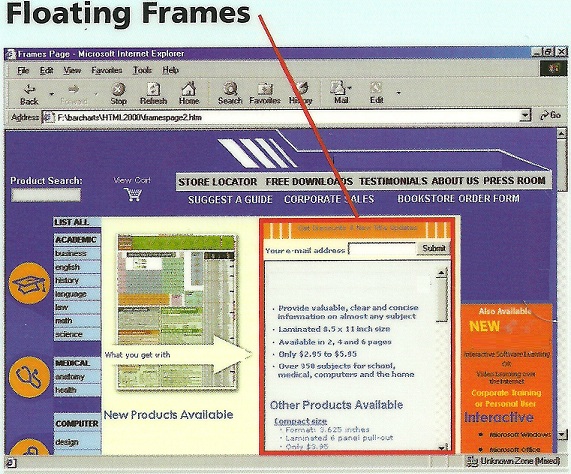
Floating frames (windowless, inline frames) are great when you have a lot of text but don't want the design of the page to scroll.
To create an inline floating frame, use the <IFRAME></IFRAME> tags:
<IFRAME NAME="Frame1" SRC="frame.htm">
The IFRAME tags creates a floating frame at its location in the HTML file; Microsoft Internet Explorer renders the frame inline; the SRC (source) attribute specifies the content to be displayed within the frame.
You can also place content into the previous IFRAME tag by using a frame destination as follows:
<A HREF="http://www.neilsite.net" TARGET="Frame1">
|
| NOSCRIPT |
|
The NOSCRIPT element provides alternate content for a client-side script that was not executed; a script will fail to execute if the browser does not support the scripting language or if the user has disabled client-side scripting; NOSCRIPT should follow the SCRIPT element for which it provides alternate content.
Basically, from here on, I hope you have learned much from my HTML guide...more importantly, my intent is that you are actually using this content to your advantage by creating your own Web pages to complete a site and have a presence on the Internet. While I have other pages dedicated towards learning about the history of computers, about JavaScript, and also about programming languages such as COBOL, Visual Basic and QuickBasic, I do not have any (and probably never will) tutorials on how to design and code using them. Thus, if you wish to learn JavaScript (for example, because you are within my JavaScript site) then you should know that JavaScript code can be inserted within HTML using the <SCRIPT LANGUAGE="JavaScript"></SCRIPT> tags.
If you have any questions, concerns, comments, or need help--then please do not hesitate to contact me by clicking the link at the bottom of your browser...
|
References